After testing out Pi-hole using containers in Part 1, it is time to deploy it on a more permanent solution so that it can run constantly to protect my entire home network. As the name suggests, Pi-hole is designed to run on Raspberry Pi, and the first step will be to acquire the hardware needed.
Getting Raspberry Pi Zero
As per Linus Tech Tip video, they recommend running Pi-hole on Raspberry Pi zero. This is essentially a shrunk-down version of the original Pi that is 3 times more powerful. This single-board computer comes with a Broadcom BCM2835 CPU clocked at 1Ghz and 512MB of RAM, which is plenty for Pi-Hole. The non-WiFi version only cost 5 USD, which is perfectly suited to all kinds of IoT project. I have been searching for interesting projects to get my hands dirty on the much-hyped IoT, and this presents a perfect opportunity.
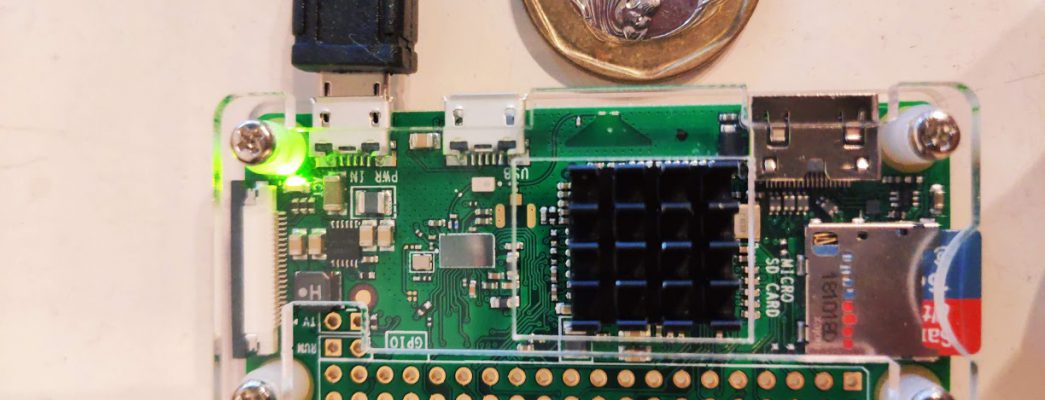
I found a Pi zero Kit on eBay, that includes a Pi Zero with WiFi, a heatsink, an acrylic case, a 16GB SD card, and a 2A power adapter (which is required to provide adequate current to the Pi Zero). It also comes with a USB OTG cable, a mini-HDMI to HDMI adapter and a GPIO header (which I have no use for this project). You can probably purchase these separately at a cheaper price, but I just go for the bundle for convenience’s sake.

Setting up Pi Zero
The package came within a week, and assembling the hardware is pretty straight forward. It is a wonder you can squeeze so much computing power into such a small package.

The next step is to install the OS. I am using Rarspbian Buster Lite. You can follow the detailed instructions here. Remember to use Etcher to copy the iso to your SD card. I tried using RUFUS but it failed to boot. Also, remember to create the SSH file so that you can SSH to your Pi Zero and the wpa_supplicant.conf file so that it can connect to your WIFI router (you can skip the last step if you are using a USB Ethernet dongle).
Insert your SD card and power up the Pi Zero. You should see the green LED starts to blink rapidly, and it would stop blinking and stayed on after a few minutes. Go to your WIFI router and find out the IP address assigned to your Pi Zero. Grab your favorite terminal and SSH to pi@<pi-zero-ip-address> and logon with the default password (raspberry). Perform a system update using sudo apt update followed by a sudo apt upgrade. You are ready to install Pi-Hole.
Installing Pi-Hole
Before you install Pi-Hole, you should probably set your Pi Zero to a static IP address as you will need to point to this IP as your DNS server. You can follow the instructions here.
You can then follow the forum post on Linus Tech Tips and skip to stage 2 to start your Pi-Hole installation steps.
Some modification that I have done:
- For step 4, I am using Quad9 as my upstream DNS, (9.9.9.9 and 149.112.112.112 ) as I am wary of tracking by Google DNS.
- For step 6, you will want to configure IPV6 if you have enabled IPv6 on your router. You should also take note of the IPV6 address that is assigned to your Pi Zero.
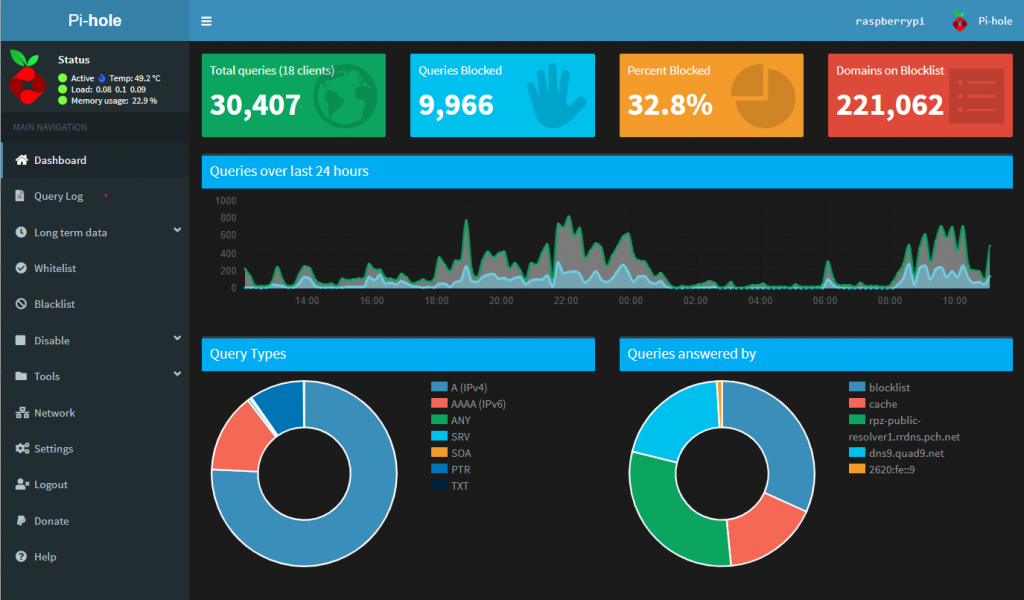
Copy the Pi-Hole IP to your browser with a slash /admin at the end, and login with the admin password displayed at the last stage of the installation, you should see Pi dashboard screen below. Noticed that there is a temperature indicator on the left and the word rasberrypi (which is the hostname) on the right (compared with the container version where there is no temperature indicator and you will see the container ID on the right).
Changing the admin password
If you want to set your own password, simply SSH back to your Pi Zero and enter the following command:
sudo pihole -a -p
Configuring Pi-Hole as your Default DNS server for the entire network
To set the Pi-Hole as your default DNS server, you would need to modify the DNS options on your DHCP server, which for most people, will be their WIFI router.
The screenshot below shows the ASUS WIFI DHCP interface, it might differ from yours if you use a WIFI router from a different vendor. I set my DNS server 1 to the Pi-Hole IP address and DNS Server 2 to my router IP address so that DNS name resolution can still function if the Pi-Hole is powered off.

If you set your router as a secondary DNS address, you would also want to set the upstream DNS server for your WIFI router.

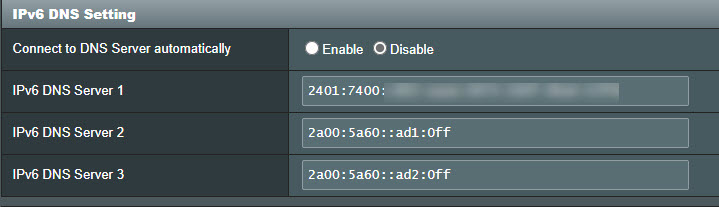
If your WIFI router is configured for IPV6, you will also need to update the IPV6 DNS to your Pi-Hole IPV6 address. I have added AdGurad IPV6 DNS as the second and third DNS servers in case my Pi-Hole is powered down.
To refresh the DNS option on a Windows PC, simply open up a command prompt and type IPconfig /renew follow by a IPconfig /all. You should see your Pi-Hole IP address listed as a DNS server.
For smartphone, simply disconnect and reconnect to your WIFI router.
Test your Pi Zero Pi-Hole
Now for the moment of truth. We shall use speedtest.com again but on a smartphone. Install Speedtest app on your phone and perform a speed test using your mobile data connection. You should see an Ad at the end of a test.

Perform the same test but this time around, connect to your home WIFI. Yeah, Ad-free.

In Part 3, I will go through some of the configurations I used to fine-tune my Pi-Hole deployment.
Happy Pi-Holing.